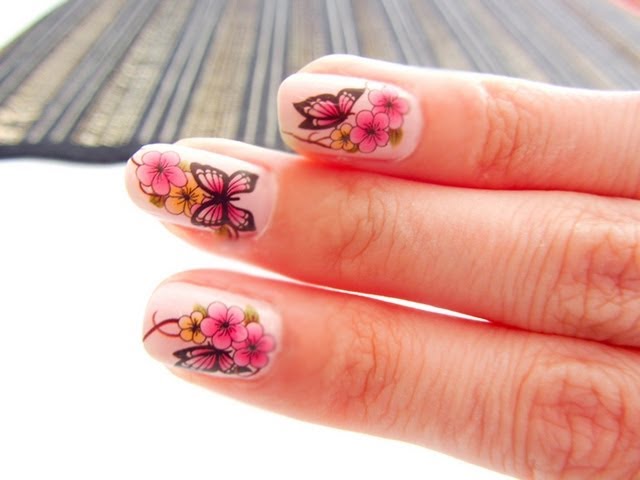
Water transfer nail stickers—also called water decals—are one of the easiest and most versatile ways to add detailed nail art at home. They are thin, printed designs that slide off a paper backing when soaked in water and transfer onto the nail. Unlike thick stickers or hand-painted art, water decals conform to the curve of the nail, look seamless under a top coat, and require very little skill to apply.
Here is everything you need to know about water transfer stickers: what they are, why they are useful, how to apply them step by step, how long they last, and how to care for them.
What Are Water Transfer Nail Stickers?
Water transfer nail stickers are thin, printed films on a paper backing. The design is printed on a water-soluble layer. When you soak the sticker in water for a few seconds, the film loosens from the paper. You then slide the film onto your nail and press it flat. Once it dries and is sealed with a top coat, it looks like the design was painted directly onto the nail.
Water decals are different from adhesive stickers or gel wraps. Adhesive stickers are peel-and-stick and can be thicker. Gel wraps are semi-cured gel strips that cure under a lamp. Water decals are the thinnest option. They are ideal for intricate patterns, tiny florals, delicate line art, and designs that would be difficult to paint by hand.
Why Use Water Transfer Nail Stickers?
Water decals offer several practical advantages.
They are thin and seamless. Because the film is extremely thin, it conforms to the nail surface and sits flat under a top coat. It does not create bulk or catch on clothing.
They provide detailed designs. Water decals can carry very fine, intricate patterns that would be almost impossible to paint freehand. Florals, lace, geometric patterns, and tiny illustrations are common.
They are beginner-friendly. You do not need a steady hand or artistic skill. The design is already printed. You only need to place it correctly.
They are affordable and widely available. A sheet of water decals usually contains many designs and costs very little. You can use them for accent nails or full sets.
They work on natural nails and enhancements. Water decals can be applied over polish, gel, or acrylic. They are versatile and easy to combine with other nail art.
They are removable. If you make a mistake during application, you can usually lift the wet decal and reposition it before sealing.
How to Apply Water Transfer Stickers to Nails?
The process is simple, but preparation and timing matter. Work one nail at a time.
What You Need
- Water transfer nail stickers
- A small bowl of room-temperature water
- Tweezers or a wooden stick
- A paper towel
- Base colour polish or gel (optional)
- Top coat
- Cuticle oil
Step-by-Step Application
Step 1: Prepare the nail. Start with clean, dry nails. Apply your base colour if you want one, and let it dry completely or cure it if using gel. The decal will sit on top of the colour. Do not apply a top coat yet.
Step 2: Cut out the design. Cut around the design you want, leaving a small margin. Do not cut too close to the image, or the film may tear. If the design is larger than your nail, trim it to fit after it is on the nail, or choose a smaller design.
Step 3: Soak the decal. Place the cut-out decal in a small bowl of room-temperature water for about 10 to 20 seconds. The film will begin to loosen from the paper. Do not leave it in the water too long, or the film may become too soft and difficult to handle.
Step 4: Slide the decal off the paper. Remove the decal from the water and place it on a paper towel for a second to remove excess water. Using tweezers or a wooden stick, gently slide the film off the paper backing. The film should release easily. If it does not, soak it for a few more seconds.
Step 5: Place the decal on the nail. Position the decal on the nail. You can use a wooden stick or your fingertip to adjust it. Work quickly while the film is still wet, because it becomes less pliable as it dries. Smooth it from the centre outward to remove air bubbles and wrinkles.
Step 6: Blot and dry. Gently press the decal with a paper towel to remove excess water and help it adhere. Make sure the edges are flat against the nail. If there is excess film hanging over the tip or sidewalls, trim it carefully with small scissors or a file after it dries slightly.
Step 7: Seal with top coat. Once the decal is completely dry, apply a generous layer of top coat over the entire nail. Cap the free edge. This seals the decal, protects it from water, and blends it into the nail. If you are using gel, apply a gel top coat and cure it under a lamp. For regular polish, use a glossy top coat and let it dry fully.
Step 8: Clean up and hydrate. Use a small brush dipped in remover to clean any excess around the cuticle. Apply cuticle oil to the skin around the nails.
How Long Do Water Transfer Stickers Last?
The longevity of water decals depends on the top coat and how well you care for your nails.
With a good top coat and proper sealing, water decals can last as long as your manicure—typically five to seven days with regular polish, and two to three weeks with gel. The decal itself is thin and fragile, but once sealed under a top coat, it is protected.
The weakest points are the edges. If the top coat wears away at the tip or sidewalls, water can get under the decal and cause it to lift. Reapplying a thin layer of top coat every few days helps maintain the seal.
Care Tips for Water Transfer Nail Art
Seal the edges well. Run the top coat along the tip and sides of the nail. This is the most important step for longevity.
Avoid soaking your hands. Water can weaken the decal and cause lifting. Wear gloves for dishwashing and cleaning. Dry your hands thoroughly after washing.
Reapply top coat. A fresh layer of top coat every two to three days refreshes the seal and keeps the design looking crisp.
Do not pick or peel. If a decal starts to lift, do not pull it. Instead, press it back down and seal it with top coat. If it is badly lifted, remove it gently and apply a new one.
Use a gentle remover. When it is time to remove the manicure, use a non-acetone remover for regular polish. For gel, use the proper soak-off method. Do not scrape the decal off with metal tools.
Store unused decals properly. Keep them in a cool, dry place away from direct sunlight and moisture. A small plastic sleeve or envelope works well.
Final Thoughts
Water transfer nail stickers are one of the simplest ways to add detailed, professional-looking nail art at home. They are thin, affordable, and beginner-friendly. With a bowl of water, a top coat, and a little patience, you can apply intricate designs in minutes. Seal them well, protect them from water, and reapply top coat regularly. Whether you use them as a full manicure or a single accent nail, water decals make beautiful nail art accessible to everyone.
Read also: Your Ultimate Guide to Christmas Nails 2026: Colors, Trends, and Easy DIY Looks